Hello readers! In this article, we will discuss the wiring diagram of an alternator. Alternators are crucial components in vehicles that convert mechanical energy into electrical energy. Understanding the wiring diagram of an alternator is essential for proper installation and troubleshooting. Let’s dive into the details!
1. Introduction to Alternator Wiring Diagram
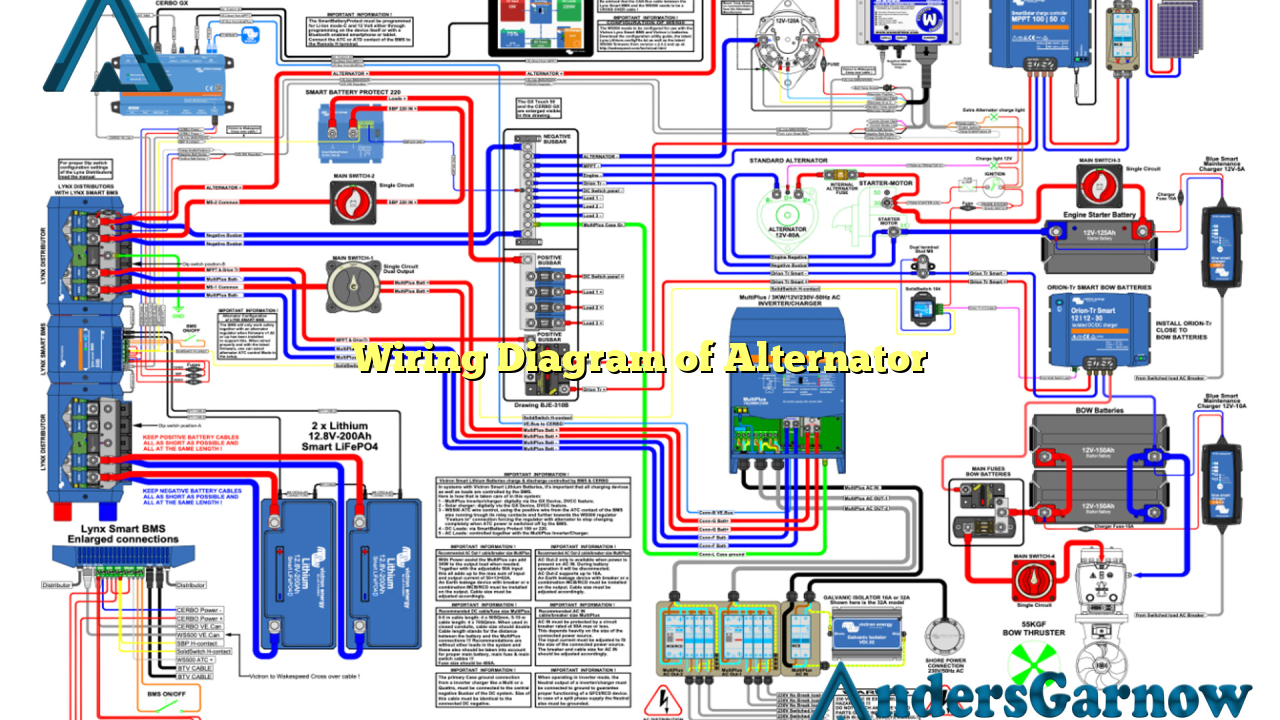
The wiring diagram of an alternator illustrates the connections between various components. It provides a visual representation of how the alternator is linked to the battery, engine, and other electrical devices in a vehicle. By referring to the wiring diagram, technicians and DIY enthusiasts can understand the electrical circuitry and diagnose any issues that may arise.
2. Key Components
The alternator wiring diagram includes several key components, such as:
| Component | Description |
|---|---|
| Alternator | The main component that generates electrical energy through mechanical rotation. |
| Battery | Stores electrical energy for future use and stabilizes voltage. |
| Engine | Provides mechanical power to drive the alternator. |
| Ignition Switch | Enables or disables the alternator’s operation. |
| Fuse | Protects the electrical system from overload and short circuits. |
| Diode Rectifier | Converts alternating current (AC) produced by the alternator into direct current (DC). |
| Voltage Regulator | Controls the output voltage of the alternator to maintain a stable electrical system. |
3. Wiring Connections
The wiring diagram shows how these components are connected. It indicates the specific terminals or wires that should be connected to ensure proper functioning of the alternator system. Each terminal or wire is labeled with a unique symbol or code, making it easier to follow the diagram during installation or troubleshooting.
4. Benefits of Understanding the Wiring Diagram
Having a good understanding of the wiring diagram of an alternator offers several benefits:
- Easy installation: With the diagram, you can quickly identify the correct connections, reducing the chances of errors during installation.
- Troubleshooting: If any issues arise, the diagram helps in identifying the faulty component or connection, making troubleshooting more efficient.
- Modification: The diagram allows for easy modification or customization of the alternator system according to specific requirements.
5. Common Issues and Troubleshooting
While alternators are generally reliable, they can encounter some common issues. Here are a few examples and their possible solutions:
- Issue: No output voltage from the alternator.
Solution: Check the wiring connections, diode rectifier, and voltage regulator for any faults. Replace any defective components. - Issue: Overcharging of the battery.
Solution: Inspect the voltage regulator and ensure it is regulating the output voltage correctly. Replace if necessary. - Issue: Low battery voltage.
Solution: Check the battery connections and the alternator belt tension. Recharge or replace the battery if needed.
6. Alternative Wiring Diagrams
There can be variations in alternator wiring diagrams depending on the vehicle make, model, and year. It is crucial to consult the specific wiring diagram for your vehicle to ensure accurate connections. Manufacturers may introduce modifications or additions to the wiring system, so it’s essential to have the most up-to-date information.
7. Frequently Asked Questions (FAQ)
Q: Can I install a higher output alternator in my vehicle?
A: Yes, it is possible to install a higher output alternator, provided the electrical system can handle the increased load. Consult a professional for proper guidance.
Q: How often should I replace the alternator?
A: Alternators typically have a lifespan of around 100,000 to 150,000 miles. However, regular maintenance and inspections are necessary to ensure optimal performance.
Conclusion
Understanding the wiring diagram of an alternator is essential for proper installation, troubleshooting, and modification. It helps in identifying the connections between various components and ensures a reliable electrical system in your vehicle. By referring to the diagram, you can confidently install or repair the alternator system. Remember to consult the specific wiring diagram for your vehicle to ensure accurate connections. Happy motoring!
