Hello readers! In this article, we will delve into the world of wiring alternator diagrams. Understanding the intricacies of this crucial component in your vehicle’s electrical system is essential for proper functioning and maintenance. So, let’s explore the various aspects of wiring alternator diagrams together.
1. What is a Wiring Alternator Diagram?
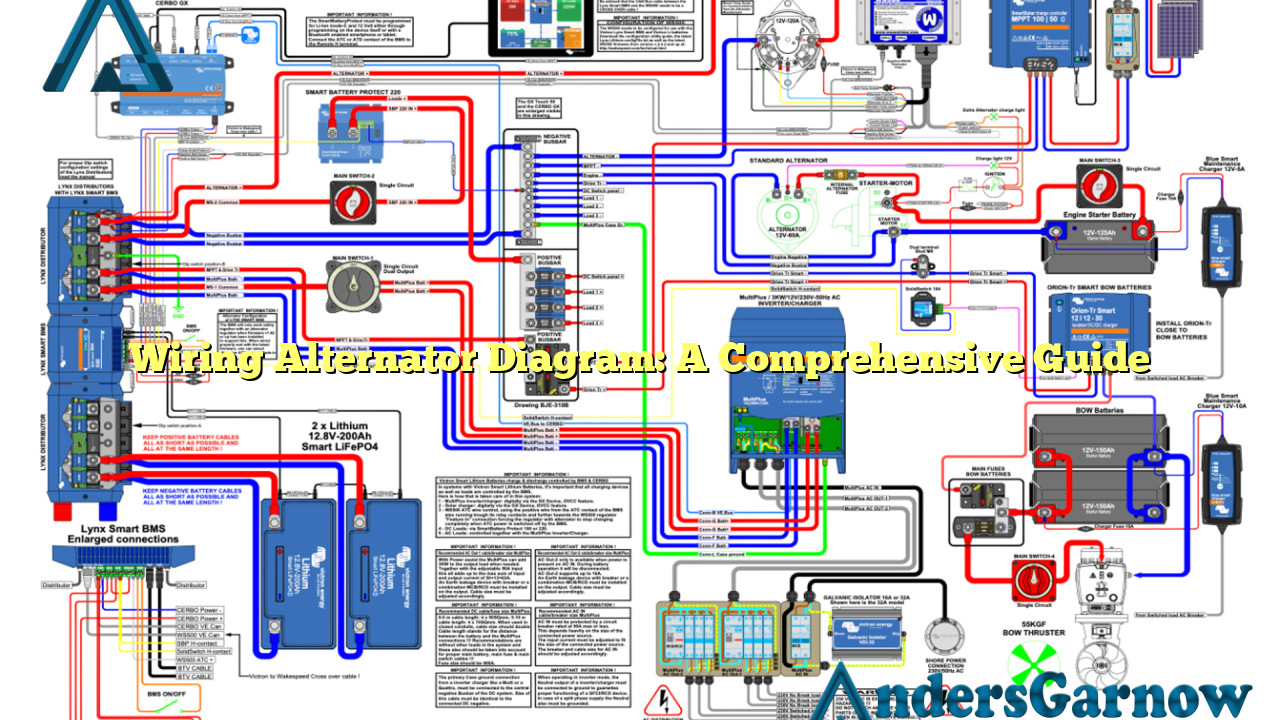
A wiring alternator diagram is a schematic representation of the electrical connections and wiring configuration of an alternator. It illustrates the placement and connection of various components, such as the rotor, stator, diode, regulator, and battery, within the alternator system.
A wiring alternator diagram serves as a valuable tool for technicians and enthusiasts alike, helping them understand the electrical pathways and diagnose any issues that may arise.
2. The Importance of Wiring Alternator Diagrams
Accurate wiring alternator diagrams play a crucial role in ensuring the proper functioning of your vehicle’s charging system. They provide a visual reference for correctly connecting the alternator’s components, allowing for efficient power generation and distribution.
Without a proper understanding of the wiring alternator diagram, you may encounter various issues, including battery drain, improper voltage regulation, or even alternator failure. Therefore, it is essential to consult the diagram when installing, repairing, or troubleshooting your alternator.
3. Benefits of Using Wiring Alternator Diagrams
Using wiring alternator diagrams offers several benefits:
- Accurate Connections: The diagram ensures accurate connections, preventing any mishaps or damage to the alternator or other electrical components.
- Troubleshooting: When encountering issues, referring to the diagram helps pinpoint the problem area and facilitates efficient troubleshooting.
- Enhanced Efficiency: Proper wiring, as guided by the diagram, ensures optimal performance and efficiency of the alternator, resulting in extended battery life.
- Easy Repairs: With a clear understanding of the diagram, repairs or replacements of faulty alternator parts become simpler and more effective.
4. Understanding the Wiring Alternator Diagram
Now, let’s break down the key components and connections typically found in a wiring alternator diagram:
Rotor:
The rotor is the rotating part of the alternator that contains a coil or permanent magnet. It creates a magnetic field that induces an electrical current in the stator.
Stator:
The stator consists of a series of wire windings arranged in a circular pattern around the rotor. As the rotor spins, the magnetic field induces an alternating current (AC) in the stator windings.
Diode:
A diode is a semiconductor device that allows the flow of electrical current in only one direction. It converts the AC produced by the stator into direct current (DC) for battery charging.
Regulator:
The regulator monitors and controls the output voltage of the alternator to ensure it remains within the desired range. It prevents overcharging or undercharging of the battery.
Battery:
The battery stores electrical energy produced by the alternator and supplies power to various electrical components in the vehicle.
5. Step-by-Step Wiring Alternator Diagram
Here is a step-by-step guide for wiring an alternator based on the diagram:
- Identify the rotor, stator, diode, regulator, and battery terminals on the alternator.
- Connect the rotor terminal to the appropriate wire or component as indicated in the diagram.
- Connect the stator terminal to its corresponding connection point.
- Attach the diode to the designated terminals, ensuring the correct polarity.
- Connect the regulator to its respective terminals on the alternator.
- Finally, establish the necessary connections between the alternator and the battery.
6. Alternatives to Wiring Alternator Diagrams
While wiring alternator diagrams provide the most accurate and specific information, there are alternative resources available:
- Manufacturer’s Manuals: Vehicle-specific manuals often include wiring diagrams tailored to your vehicle’s make and model.
- Online Forums and Communities: Engaging in online discussions with fellow enthusiasts or professionals can provide insights and alternative wiring approaches.
- Professional Assistance: When in doubt, consulting a qualified technician or electrician can help ensure proper wiring without relying solely on diagrams.
7. Wiring Alternator Diagram: Frequently Asked Questions
Q: Can I use a wiring alternator diagram for any vehicle?
A: While the basic principles remain the same, specific wiring alternator diagrams may vary between vehicle makes and models. It is crucial to refer to the diagram specific to your vehicle.
Q: How often should I consult the wiring alternator diagram?
A: You should consult the diagram whenever you install, repair, or troubleshoot the alternator or related electrical components. It ensures correct connections and prevents potential issues.
Q: Are wiring alternator diagrams available online?
A: Yes, many automotive websites and forums provide wiring alternator diagrams for various vehicle models. Additionally, vehicle manufacturers may also offer online resources for their specific models.
8. Wiring Alternator Diagram: Complete Information Table
| Component | Function | Connection |
|---|---|---|
| Rotor | Creates a magnetic field | Connected to appropriate wire/component |
| Stator | Produces alternating current (AC) | Connected to designated connection point |
| Diode | Converts AC to direct current (DC) | Attached to designated terminals with correct polarity |
| Regulator | Maintains desired voltage output | Connected to respective alternator terminals |
| Battery | Stores electrical energy | Connected to alternator terminals |
Conclusion
In conclusion, understanding the wiring alternator diagram is vital for maintaining a properly functioning electrical system in your vehicle. By following the diagram and making accurate connections, you can ensure optimal performance, prevent potential issues, and extend the lifespan of your alternator and battery. Remember to consult the diagram whenever needed and seek professional help when unsure. Happy wiring!
